In the part one and part two of this tutorial we have discussed what PhoneGap mobile application framework is, its key components and elements. We have created a new PhoneGap mobile app project for iOS platform and started adding code for most used mobile application components. First such functionality was a communication with remote web services and 3rd party API’s through HTTP protocol by using jQuery library. Our mobile application has got a minimalistic and nice looking design created by using HTML5 markup and CSS styling.
In this part of the tutorial we will be adding data storage functionality and native application controls. Yes, native iOS controls so our PhoneGap based mobile app has a native look and feel native to its users. Such possibility to add native elements to PhoneGap hybrid mobile applications is one of the biggest strengths of this framework.
I’m going to be working with the code from the last tutorial part (you can find it on the bottom of the previous tutorial page). And the link to completed source code of today’s tutorial can be found at the end of tutorial. Lets get started.
First we are going to write a code to store last keyword that was used for search on the mobile device and retrieve it (for refilling search text box) once user launches application next time.
What storage for PhoneGap projects?

We have 2 main options available to us in order to store data while using PhoneGap framework. One is SQL Lite database another one is local storage / session storage.
SQL lite based storage is quite a powerful option allowing application developers to interface database with SQL language meaning that your application can perform advanced searches and various analytic on the data stored in the database. The syntax of creating and communicating with such database by using PhoneGap API is the following
var localDatabase = window.openDatabase(database_name, database_version, database_displayname, database_size);
In your code you provide database name, version, display name and size. After database is created / accessed you get back database object and do interaction with it via db.transaction() method. For more information about SLQ lite implementation in PhoneGap projects check the documentation page.
Another method of storing data is local (session) storage. Its much simpler and is usually used to keep small amounts of data between application launches. Local storage in HTML5 world is the way to store data locally within the browser filesystem. This replaces storing data in cookies as faster and more secure approach. You do use key value pairs to store the data. Example implementation in PhoneGap app would be
window.localStorage.setItem("key", "value");
Session storage is similar to the local storage but data gets cleared after each browser session (once browser stops running).
For our application we are going to use local storage option and will save the last search keyword provided by user in order to populate search field next time our application is started. This data will be kept available for us in between application launches (after app is fully stopped by user). First we have to update our callWebService() function with the code to retrieve search term and store it locally
// Storing value in the local storage
var searchTerm = $("#question").val();
window.localStorage.setItem("searchTerm", searchTerm);
var question = window.localStorage.getItem("searchTerm");
And now once we have this value stored our application can ask jQuery to update search text input field on application start.
// Getting last used search keyword and updating input text field
var lastSearch = window.localStorage.getItem("searchTerm");
$("#question").val(lastSearch);
Our application will pre populate the last search keyword used by user in the text field with id="question" to remind application user what item he / she searched for the last time they viewed this page. I’m sure you can think of many more applications for such storing user data via PhoneGap storage APIs. Note that if you don’t want to keep locally stored data after application is closed use window.sessionStorage instead. Full source code of my main index.html file after changes are made
<!DOCTYPE html>
<!--
YummyThings app
index.html

Created by Saul Zukauskas @sauliuz
PopularOwl Labs // www.popularowl.com
@16.04.2013
-->
<html>
    <head>
        <meta charset="utf-8" />
        <meta name="format-detection" content="telephone=no" />
        <meta name="viewport" content="user-scalable=no, initial-scale=1, maximum-scale=1, minimum-scale=1, width=device-width, height=device-height, target-densitydpi=device-dpi" />
        <link rel="stylesheet" type="text/css" href="css/index.css" />
        <title></title>
        <script type="text/javascript" src="js/cordova-2.6.0.js"></script>
        <script type="text/javascript" src="js/index.js"></script>
        <script type="text/javascript" src="js/jquery.js"></script>
   </head>
   <body>

        <script type="text/javascript">
            $( document ).ready(function() {

                // Getting the last used search keyword
                // and updating the input text field
                var lastSearch = window.localStorage.getItem("searchTerm");
                $("#question").val(lastSearch);

                // Once share class button clicked we will
                // show content class element on the screen
                $(".share").click(function (e) {
                  $('.content').toggleClass('show');

                  e.preventDefault();
                });
            });
        </script>
        <script type="text/javascript" charset="utf-8">

            function callWebService(){

                // We don't want API call to be made everytime
                // button is clicked. Only if no data loaded or
                // search keyword has changed
                if ($('#yummy').is(':empty') || window.localStorage.getItem("searchTerm") !== $("#question").val()){

                    // Adding spinner image until we will get response
                    $("#yummy").append("<img class='spinner' src='img/loadinfo.net.gif' />");

                    // Storing value in the local storage
                    var searchTerm = $("#question").val();
                    window.localStorage.setItem("searchTerm", searchTerm);

                    var question = window.localStorage.getItem("searchTerm");

                    // Log
                    console.log("Question value from textfield: " + question);

                    //create the request url
                    var url = "http://your.test.server.url/?q=" + question + "&requirePictures=true";

                    // Log
                    console.log("Request string: " + url);

                    // Call to web server
                    $.get(url, function(data) {

                                    // Clear spinner
                                    $("#yummy").empty();

                                    // Add results to HTML
                                    $("#yummy").html(data);

                                    // Log received content
                                    console.log("Received string: " + data);

                                }
                          );
                } // end if
           }//end of method
         </script>

        <div id="menu">
            <input id="question" type="text"></input>
            <div type="button" onclick="callWebService()" id="webservice_call">Find recipes</div>
            <div id="yummy"></div>
        </div>
    </body>
</html>
How to use native controls in PhoneGap mobile applications?
By using PhoneGap local storage API we have started to actually interfere with the native elements of iOS (in our case this was data stored within the WebKit component). How PhoneGap does that? And how can we add some native controls like navigation bar on top of our view?
PhoneGap framework has 3 parts to it. Native core which is written in the native language for a specific mobile OS (Objective-C for iOS, Java for Android etc.). JavaScript API implementation file which exposes JavaScript functions to be used in the html files and maps these functions to a PhoneGap core. And a JavaScript code which you write in the mobile application html files (served from www directory) and which can use all the functions described in JavaScript API implementation. This is one of the key features which make PhoneGap hybrid application framework very powerful.
And the good news are – developers can extend PhoneGap core with custom plugins. This is done in the similar manner I have described above: implementing the needed functionality in the native code, creating a JavaScript file which maps native code with JavaScript functions and just using these functions in your code. And the beauty of open source is that developer community is always helpful and willing to share their knowledge. There are many of PhoneGap plugins already crated by PhoneGap and the developer community.
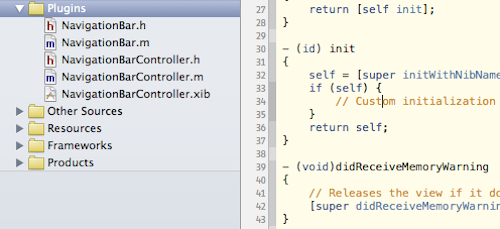
In our tutorial I will not make you code in Objective-C and we are going to use plugin which I wrote few weeks ago inspired by couple of other PhoneGap native iOS plugins out there. This plugin has 6 files and below are the instructions where to import them.
First 5 PhoneGap plugin files go to our projects plugins directory

Remaining NavigationBar.js file goes into our projects main js folder. You can find and download all above plugin files from the GitHub repository.
After all files are imported into the project whats left is to add JavaScript code to our main index.js file for setting up navigation bar
// Will load Cordova iOS plugin
// to get native navigation bar

var navBar = cordova.require("cordova/plugin/iOSNavigationBar");
navBar.init();

// Create Navigation Bar with style
navBar.create("BlackOpaque");
Now once we have navigation bar in place I have added about.html file and created a function to display about page once about button is clicked on the navigation bar. We have to also manage the title of nav bar based on which page is being displayed and I created JavaScript code for this as well. After all the improvements our index.js code looks like this
// We have to add event listeners to capture main events
// Cordova framework sends us.
document.addEventListener("deviceready", onDeviceReady, false);

//////////////////////////////////////////////////////////
// Functions                                            //
//////////////////////////////////////////////////////////

function onDeviceReady() {
    // Log
    console.log('Received Event: deviceready');

    // Navigation management
    //window.sessionStorage.setItem("page", "index");
    var activePage = window.sessionStorage.getItem("page");

    console.log('Current page: ' + activePage);

    // We have to load custom Cordova iOS plugin
    // for native controls. Will be used to get custom navigation bar

    var navBar = cordova.require("cordova/plugin/iOSNavigationBar");
    navBar.init();

    // Create Navigation Bar with style
    navBar.create("BlackOpaque");

    switch(activePage) {
        case "index":
        navBar.setTitle("Yummy Things");
        break;
        case "about":
        navBar.setTitle("Yummy Things");
        break;
        default:
        navBar.setTitle("Yummy Things");
    }

    navBar.show();

    // Creating and managing
    // navigation buttons
    // Create right navigation button with a title

    switch(activePage) {
        case "index":
        navBar.setupRightButton("About","",onRightNavButtonClick);
        navBar.hideLeftButton();
        navBar.showRightButton();
        break;
        case "about":
        navBar.hideRightButton();
        navBar.setupLeftButton("Back","",onLeftNavButtonClick);
        navBar.showLeftButton();
        break;
        default:
        navBar.setupRightButton("About","",onRightNavButtonClick);
        navBar.hideLeftButton();
        navBar.showRightButton();
    }

    // Navigation button actions
    // Right button
    function onRightNavButtonClick() {
        // navigation management
        window.sessionStorage.clear();
        window.sessionStorage.setItem("page", "about");
        window.location = "about.html";
        console.log('Performed onRightNavButtonClick' + activePage);
    }

    // Left button
    function onLeftNavButtonClick() {
        window.sessionStorage.clear();
        window.sessionStorage.setItem("page", "index");
        window.location = "index.html";
        // navigation management
        console.log('Performed onLeftNavButtonClick');
    }
}
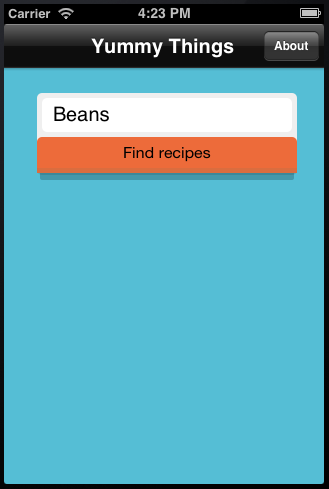
There are additional functions in the code to handle button clicks and I’m using the session storage (remember, we just talked about it earlier) to keep the track on which page mobile application user currently is. After compiling and launching Yummy Things application in the simulator we have navigation bar and the about button in place. These are native controls, the same you get while developing mobile application natively.

With this bit done we are now closing to the end of these tutorial series with only the last part left.
What’s Next?
You can progress to the last part of tutorial, where I’m implementing Geo location API, delayed splash screen, mobile application launch icons and talking a little bit about PhoneGap application debugging and architecture. I’m always looking for comments and suggestions, if you have any leave them in the comments under this post or get in touch directly. As always you can get most recent tutorial source code in the compressed format. Have fun!
3 Responses
Thanks for the tuto : I was wondering why this part is commented in your code : //window.sessionStorage.setItem(“page”, “index”);
hey Frederic, this line is commented out because it would run every time page is reloaded (this will happen with each button click).
We don’t want to auto set “page” value to index every time as About page would get incorrect nav bar buttons.
Does that help?
Yes it does. Thanks a lot for the explanation