This is the final tutorial part for developing simple PhoneGap based mobile application from the ground up. Earlier in tutorial parts one, two and three we took a closer look at what role PhoneGap hybrid mobile development framework plays in mobile development and how it works. We have created a new project and added several elements of functionality, similar to what most mobile applications out there would have – user interface, HTTP communication, data storage, native controls etc. In this final part I’m going to show you Geolocation API implementation, how to prepare and delay application splash screen and finalize everything with application icon. We’ll be working with the code from the last tutorial part (you can find at the bottom of tutorial part 3). Source code for overall finished PhoneGap application example (including today’s changes) can be found at the bottom of this post. Lets get started!
Geolocation in PhoneGap mobile applications
Geolocation API is there to provide your app with information on actual location of the device app is running on. In most cases its done in format of latitude and longitude. Location data is provided by mobile OS which is running on the device (it uses GPS and various network ID’s to crystallize this data).
As per PhoneGap documentation, there is no guarantee that Geolocation API will provide your app with the current location data and this is important information to consider then you are designing your app. There should always be a fallback scenario in your code in case device will not return Geolocation data.
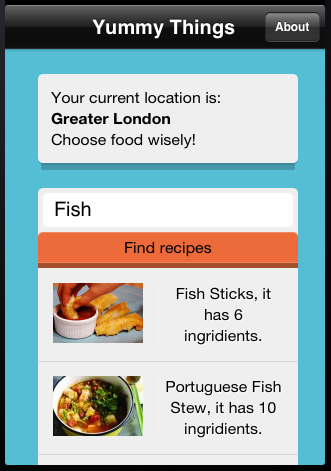
How we are going to use the data? Well lets simply add a notification box over the recipes search field telling our app user where he currently is. Just to avoid disappointed app users who cannot buy the right ingredients in stores.. Jokes aside here is how we are going to implement it in our PhoneGap project.
navigator.geolocation.getCurrentPosition(onSuccess, onError);
Its the JavaScript API call to retrieve current mobile device position, where onSuccess and onError are the functions for handling success and error for this call. PhoneGap official documentation gives you detailed explanation. If successful this call will give us back the position object witch contains several device position related values like speed, latitude, longitude and others. We are going to use latitude and longitude to check on the name of our current location.
var latitude = position.coords.latitude;
var longitude = position.coords.longitude;
We need to translate these coordinates to the actual location name and maps.googleapis will help us to do that. As we already have php back end file serving us as communication service with 3rd party APIs (tutorial part 2) we are going to add few lines of code so it makes additional API call to maps.googleapis service which will give us back the name of location based on supplied coordinates.
// Building string for request
//
$requeststr = "http://maps.googleapis.com/maps/api/geocode/json?";

$requeststr=$requeststr."latlng=".$latitude.",".$longitude;
$requeststr=$requeststr."&sensor=true";

// CURL for communicating with web service
//
$ch = curl_init();
curl_setopt($ch, CURLOPT_URL,$requeststr);
curl_setopt($ch, CURLOPT_VERBOSE, 1);

curl_setopt($ch, CURLOPT_SSL_VERIFYPEER, FALSE);
curl_setopt($ch, CURLOPT_SSL_VERIFYHOST, FALSE);

curl_setopt($ch, CURLOPT_RETURNTRANSFER,1);

$response = curl_exec($ch);

// We will do some heavy lifting on the server side
// parse JSON and send back already prepared html with
// only the elements we have to add to fields
//
$response_decoded = json_decode($response, true);

// Give back location name
//
echo $response_decoded['results']['0']['address_components']['3']['long_name'];
Now once we have back end service in place we are going to amend the main index.js file in our project so it performs jQuery http get request to the back end providing the retrieved device coordinates. After receiving response this code will also populate dedicated <div> element for displaying geo location name. Here is the JavaScript code I have added to the file, detailed explanations follow below
// To retrieve current city name
// based on current device location we
// will use PhoneGap Geolocation API
// and some Google Map API's magic

// Handeling 2 possible outcomes - success and failature
//
navigator.geolocation.getCurrentPosition(onSuccess, onError);

function onSuccess(position) {

     // Capturing values for latitude + longitude
     //
     var latitude = position.coords.latitude;
     var longitude = position.coords.longitude;

     console.log('Received current location: ' + latitude + ',' + longitude);

     // Asking maps.googleapis for name of the city
     //
     var url = 'http://your.server.url/?latitude='+latitude+'&longitude='+longitude;

     $.get(url, function(data) {

       // Add results to HTML
       //
       $("#locationplaceholder").html("<div id='location'>Your current location is:<br /><strong>"+data+"</strong><br />Choose food wisely!</div>");

       // Log received content
       console.log("Location = " + data);

     });

}

// onError Callback receives a PositionError object
//
function onError(error) {
   console.log('Received geolocation error. code:' + error.code);
   console.log('Received geolocation error. code:' + error.message);
}
Above code is already commented out (Its a good habit to spend some time to comment what your code is doing. saves time in the long run). We first retrieve coordinates through PhoneGap API, next performing http get request to selected back end server (replace this url with the one of your server containing back end php script). On successful response we update <div id="locationplaceholder"> element in the main index.html interface file. If we fail to retrieve position coordinates from the device onError function just logs error to the console. You can perform more advanced actions in this place if needed. After launching application now we can see the our current location.

Adding Splash screen in PhoneGap mobile projects
Once application is launched in most cases the first initial screen your users will see will be splash screen. As developer you can enable or disable this screen in your projects. Sometimes you will need it to be displayed for a longer then default time frame. In PhoneGap projects Splash screen is shown by default so you just have to replace default image files in Resources/splash project directory.
navigator.splashscreen.hide();
navigator.splashscreen.show();
And a little trick for keeping Splash screen on a screen a little longer (you will have to set AutoHideSplashScreen option in config.xml to false)
setTimeout(function() {
    navigator.splashscreen.hide();
}, 2000);
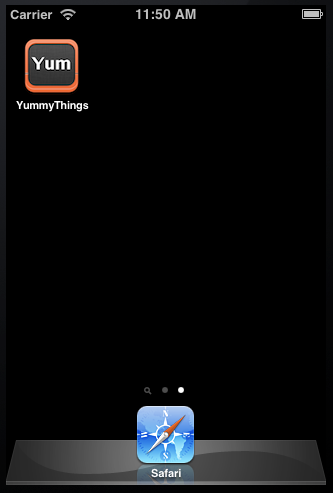
For our project I have just replaced default PhoneGap image to the Yummy Things splash screen image. I have also replaced mobile application icon (for standard and retina displays) in Resources/icons project directory. These are the icons your users will see on their mobile home screens. Application icons are one of the main criteria for users to select application from app store. Make sure it stands out. As for Yummy Things I quickly created simple icon with Yum on it. Now once install on the simulator or iOS powered device our application has custom icon and splash screen.

Developing and debugging PhoneGap projects
With this done we can call our example application done. I hope these bones can serve as a starting point for your own applications built using PhoneGap mobile app development framework. At PopularOwl I’m currently working on one PhoneGap based project which consumes data from WordPress powered eCommerce site. Its an interesting experience and I’m planning to share it with you in the one or two posts here on htmlcenter site soon. Stay tuned!
As a finishing note to these tutorial series I want to mention few things about PhoneGap project architecture and debugging.
Mobile apps developed with PhoneGap framework are not your standard web apps. Yes, they are using HTML5 markup, JavaScript and CSS for styling but the content lives mostly on users mobile device as applications have to be functional offline as well as online. This means there is no remote web server to serve your pages. And mobile device is not your friend once it comes to reproduce web server behavior. So what do we do in complex PhoneGap mobile apps? The architecture is usually to have only one entry html page and add / remove markup from it by using JavaScript. JavaScript also creates transition effects and routing management (what content gets loaded once user goes to specific pages).
Debugging PhoneGap projects is actually not so straight forward. As the project runs in webview you will not get much out of native mobile OS debugging tools. You can log events in console (I did it in our example application) but in order to insert break point, stop the code and find what values are set you will have to use some sort of remote debugging solution. Weinre can be your friend here and debug.phonegap.com had its installation running. The idea is to insert specific JavaScript code into your application which will send information to remote server and you can see it through separate web interface. Quite a painful process.
Another option is to architect your PhoneGap mobile application so it its runnable on any web browser. This way you can use browser inbuilt tools for debugging. By designing your application to run in standard web browsers I mean make its life not dependent on specific PhoneGap APIs. For example before accessing any not native JavaScript API make sure it is accessible
function showAlert {
   // Are we wraped with
   // PhoneGap or running
   // in the browser?
   //
   if (navigator.notification) {
     navigator.notification.alert(message, null, title, 'OK');
   } else {
     alert(title + ": " + message) : message);
   }
}
If you want to better understand PhoneGap application design I would strongly recommend video presentation by Christophe Coenraets.
Several other useful links to keep you going. Template frameworks for PhoneGap applications (allows you to dynamically load html markup and keep it organized in separate files) – Mustache.js, Underscore.js. For front end check out Ratchet and TopCoat CSS frameworks.
Finally you can find the source code for mobile app we have created during 4 tutorial parts on GitHub. This is by no means completed application but it might (and I hope it will) give you some thoughts and push to create and publish your own PhoneGap based applications. As always comments, questions and suggestions are welcome.
4 Responses
great stuff for beginners. keep up the good work.
Great that its useful
Yeah its awesome, i was having difficulty in learning objective-C and it made me so much easy. Thank you so much Saul :)
u r welcome