The other day, I was talking with my friend Aaron (@riddlebrothers) about all of the various e-mail addresses we have and how we use them. At one point, after discussing the virtues of using Yahoo! Mail, I mentioned that the e-mail addresses I have hosted on my own servers are often unreliable. I told him that I rarely give out anything but my Yahoo! e-mail address, because a lot of messages get lost in cyberspace with my other accounts.
He asked me if I had looked into using Google Apps for my domain-based e-mail services. I honestly hadn’t thought about it before (in fact, I made a post a while back about how strange it was that everyone was moving to Gmail). However, his suggestion made sense. Following are some of the advantages I see in moving your e-mail over to Google Apps:
- Reliability – Although Gmail has been out of commission a few times over the last couple of months, it has proven to be reliable as an e-mail service. I rarely, if ever, hear about anyone losing e-mail messages or not receiving important messages when using Gmail.
- Portability – How many times have you moved your domain to a new server and been frustrated by the fact that you lost all of your e-mail messages? If you switch over to Google Apps, you never have to worry about that again (at least, until Google goes away, which I don’t expect to happen any time soon). You can keep your e-mail on the same service even when you switch the server on which your Web site is hosted.
- Service and support – Your e-mail service is important to you. If your e-mail is hosted on your Web server, and the e-mail service starts malfunctioning, you have little recourse but to contact your service provider. Nine times out of ten, the problem is relegated specifically to your server, and possibly even to your account. It makes it difficult to pinpoint the problem and fix it, and it means that you are probably not a high-priority. However, with Google, when a problem arises, it most likely effects everyone else that’s using Gmail, which means that fixing it becomes the highest priority for your service provider.
- Server limits – Sure, when your e-mail service is hosted on your Web server, you generally get promises of outrageous amounts of storage space and unlimited e-mail accounts. However, as I pointed out in a previous post, most service providers actually limit the number of inodes on your account. Each e-mail message (sent, received, trash, etc.) counts as an individual inode. Therefore, if you have an account that limits you to 50,000 inodes, and you have 20,000 e-mail messages, you’ve already used up 40% of your inodes simply by having e-mail hosted on your server. You can eliminate that concern by moving your e-mail over to Google apps.
Moving Your Services to Google
Preparing for the Move
Before you actually start moving your e-mail services to the Google server, I would recommend backing up all of your old e-mail messages to a safe place. Once the migration is completed, it will be difficult (though not impossible) to access your old e-mail server using an e-mail client like Outlook.
In my case, I have created a new folder inside of my “On This Computer” folder in Evolution (in Outlook, I believe this is called “Local Folders”) for my Inbox and a new folder for my Sent messages. I then selected all of the messages in my Inbox on my current e-mail server and moved them into the new local folder I created. I repeated the same steps for my sent messages.
If you forget to take this step before you switch everything over, you might be able to access your old e-mail server using the IP address, depending on how your original e-mail server was configured. Evolution automatically chooses the appropriate port for the specific type of e-mail connection you’re using, so all I had to do was enter my IP address. However, if you are using an e-mail client that requires you to enter a port number, as well, I do know that secure (SSL) IMAP connections are usually on port 1096.
Creating Your Account
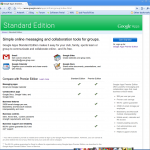 Now that I’ve gone over the benefits of moving to Google Apps, I’m going to explain, step-by-step, how to accomplish this task. It’s actually very simple, but it will take a long time.
To begin with, head on over to Google and sign up for an account. For most of us, the free account offered by Google is more than enough. However, they do offer a “premier edition” if your needs exceed the services of the free accounts.
One important note: Although the comparison between the Standard Edition and the Premier Edition says that only the Premier Edition offers Microsoft Outlook interoperability, that does not mean you can’t use Microsoft Outlook (or the iPhone or any other e-mail client) with the Standard Edition. You can enable IMAP services on the Standard Edition and connect to it through Outlook. I am assuming that the “interoperability” to which they’re referring in that comparison is the automatic sync of e-mail, contacts and calendar all together, the way an Exchange server works.
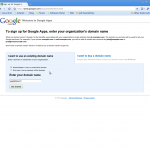 Anyway, go ahead and sign up for your account. For purposes of this article, I’m signing up for the Standard Edition. Just click the “Get Started” button and fill in the information requested.
- Indicate whether or not you own a domain name. If so, indicate whether or not you are an administrative user of the domain (do you have the ability to upload files via FTP or to modify the DNS entries). In my case, I am an administrator of the domain, so I have indicated that. Then, enter the domain name you will be using.
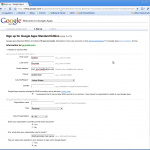 Fill in all of your contact information, information about your organization (if applicable) and make sure you agree to the fact that you have permission to edit your DNS entries. As with most Web forms, there are some required fields. In this particular instance, they are currently indicated with an asterisk (*) to the right of the label. If you don’t provide the required information, you will receive an error when you submit the form.
Important: Make absolutely certain that you are able to edit your server’s DNS zone files before filling in this form. If you cannot edit your DNS zone files, do not proceed. Signing up for the Google Apps account is useless if you’re not going to be able to modify your server appropriately to have the e-mail go where it’s intended.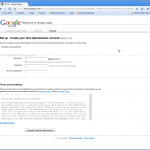 Create your first e-mail account. This e-mail account will be used as the administrative account for the Google Apps services. If you are actually moving an existing e-mail service over to Google Apps, I would recommend using the same username you are already using for your e-mail. However, you can use any username you desire.
In this step, you will be confronted with the Terms and Conditions. These terms and conditions are fairly standard for Google’s services, but they are worth a quick read. Keep in mind that these terms also include, by reference, the Google Privacy Policy and the Program Policy, so you might need to read those, as well.
If you will be using your e-mail to send and receive highly confidential information, you really should read these terms carefully. You might even want to have a lawyer review them before proceeding. Google does sometimes have some abnormal terms relating to the ownership and usage of the data in your account, so this may not be the ideal solution if you are transmitting highly confidential or sensitive information.
Verify Domain Ownership
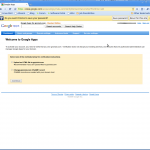 The next step in the process is to prove to Google that you own and have administrative rights to the domain you chose. You have two options to prove you own the domain. The first option is to simply create and upload an HTML file to your Web server. This method of verification is similar to the way you verify ownership when setting up an Analytics account. The other option is to modify your DNS entries to add a unique CNAME record.
With the first e-mail server I moved, I chose the first option. I simply created a new HTML file with the unique string Google provided, and uploaded it to my Web server. This was very simple and very quick.
This time, I chose to create a new CNAME entry in my DNS zones. This is also fairly simple to do, and is actually good practice for modifying your MX records when the time comes. If you choose this method, you’ll be one step ahead of the game when it comes time to modify your MX records, as you’ll already know for certain where your DNS zone file is located and how to modify it. This method will take a bit longer, though, than using a simple HTML file. However, on the plus side, this method doesn’t clutter your Web server with additional files.
If you are using Site5 hosting, you’ll find your DNS zone file by accessing the SiteAdmin panel for your domain, then clicking the “Manage My Domains” tab on the left menu and choosing “DNS Zone Files.” Keep in mind that, even if your domain is registered with someone other than your Web host, the detailed DNS entries are actually handled by your Web host. In my case, my domain is actually registered with Network Solutions, but the only things I am able to modify through Network Solutions are the actual DNS addresses. Anything beyond that (CNAME records, MX records, etc.) are all handled on the other end with my Web host.
If you use the CNAME modification method, you can move onto the next steps before the CNAME change has propagated, but you won’t know for sure that everything is going to work properly until that propagation is completed.
Google has prepared a guide to walk you through the remaining steps. The guide provides pretty good information, but it’s somewhat long-winded (rightfully so, since it’s providing you with all of the information you need to set up the whole thing).
Setting Up Your E-mail Server
The next step is to set up the URI you want to use to access Webmail. In most cases, this is either webmail.example.com or simply mail.example.com. To make this change, click on the “Service Settings” tab in the top menu of the dashboard. Then, click “Email.” From there, specify that you want to use a custom URL, and enter the appropriate subdomain for your domain. Submit that form, and Google will then provide you with information about adding a CNAME entry for your new subdomain.
Once you have done that, return to your dashboard. You should check your current list of e-mail accounts and create a corresponding Google Apps account (under the “Users and groups” tab in the Dashboard) for each.
MX Record Changes
Once you have finished creating all of the users, you can return to the dashboard and click “Activate email.” Follow the MX change instructions provided by Google. If you’re fortunate enough to use one of the hosts included in the dropdown menu there, you should be able to get clear, specific instructions explaining how to make the changes in your host’s control panel. My host is not included in the list, so I had to use the generic instructions.
Google will have you add seven new MX records to your DNS zone file. Those entries will probably look like:
| MX Server address | Priority |
|---|---|
| ASPMX.L.GOOGLE.COM. | 10 |
| ALT1.ASPMX.L.GOOGLE.COM. | 20 |
| ALT2.ASPMX.L.GOOGLE.COM. | 20 |
| ASPMX2.GOOGLEMAIL.COM. | 30 |
| ASPMX3.GOOGLEMAIL.COM. | 30 |
| ASPMX4.GOOGLEMAIL.COM. | 30 |
| ASPMX5.GOOGLEMAIL.COM. | 30 |
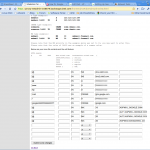 It’s important that you copy and paste those addresses exactly as they appear in the Google instructions. They all include dots at the end of the addresses, and that dot needs to be included.
If your DNS control panel looks like the one provided by Site5, your new entries will need to look similar to:
| @ | IN | MX | 10 | ASPMX.L.GOOGLE.COM. |
Where the @ symbol is in the first spot, the second spot is left blank, the word “IN” is in the third spot, the fourth spot is filled with “MX”, the fifth spot is the “priority” and the last spot includes the address provided by Google.
Also, in the case of Site5, you can only add four entries to the zone file at a time, so you’ll have to add the first four, then save the file, then add the other three.
Once you’ve made those changes, click the “I’ve made these changes” button in the Google Apps window.
Conclusion and Resources
At this point, you’re pretty much done. You now simply have to play “the waiting game.” It can take anywhere from one hour to 48 hours before the changes are complete.
Once the changes have completed, though, you can set up your e-mail client (Outlook, Thunderbird, Evolution, etc.) to check your e-mail. The Gmail IMAP settings are fairly simple. They are as follows:
IMAP (incoming) mail:
- Server: imap.gmail.com
- Port: 993
- Encryption: SSL
SMTP (outgoing) mail:
- Server: smtp.gmail.com
- Port: 465 or 587
- Encryption: TLS
Google provides good instructions for this set up, including specific instructions for certain e-mail clients.
I initially used some instructions from the Site5 user forums to figure out how to do this. Thanks to lenwood for putting those instructions together. I couldn’t have done this without his guide.
I also used the Mx Toolbox to occasionally check the status of my DNS zone changes. The tool was extremely helpful.
Edit: It should also be noted that you can set up custom subdomains for the other Google App services (calendar, docs, etc.) by following the same steps you followed to set up your custom Webmail subdomain. For instance, if you want to use calendar.example.com to access your Google Apps calendar, you can add a new CNAME record for “calendar” by following the steps listed under “Service Settings -> Calendar” in the Google Apps dashboard.
17 Responses
Glad it worked out for you! This is also a nice summary of the process sure to help out others looking for the same advantages.
I am in the process of setting up a new google apps account. I have domain hosting through another company.
Here is my setup
1) mydomain.com <== primary domain
2) info.mydomain.com <=== info sub-domain
3) mail.mydomain.com <=== mail sub-domain.
4) googleffffff12345678.mydomain.com <==== cname verification purposes.
MX record for mydomain.com points to my domain hosts mail server.
MX record for mail.mydomain.com points to google mail servers as you indicated. CNAME record is blank.
If I setup a user , say, [email protected] with Google Apps, and sent an email to this user from an outside account, will it work?
In other words, do I need to change the MX record for the primary "mydomain.com" also to point to google servers to make this work? OR do I need to setup user as [email protected] for this to work?
Whats the best practice to setup mail subdomains and MX records?
Any help is highly appreciated.
Thanks
Hi this is very informative. in your case, if the site5 server down, will it affect the mail services?
i.e if the hosting server is down, then email also wont work?
As long as Google’s servers are up and running, my e-mail works, too. The e-mail services aren’t dependent on your Web host.
I’m not sure if we are trying to do the same thing but this is my objective,
Please note, my company website is http://www.secondary.com... and I have 16 users with this email address [email protected]
I now have set up a primary domain and a sub domain (secondary.com).
http://www.primary.com is set up as a premium google apps
http://www.secondary.com is a sub-domain of primary.com.
When I email [email protected] it works.
When I email [email protected], it automatically forwards to [email protected].
Just as expected..
Now, how do I set up additional email accounts for the secondary.com domain. My secondary.com is my company’s website. Primary.com is set up for google apps premier.
My objectives is that I have 4 users I want on Premiere using IMAP and the rest using standard google apps with POP or IMAP or Gmail interface.
IE:
[email protected] but, handing out the email [email protected] to clients
[email protected] but, handing out the email [email protected] to clients
[email protected] but, handing out the email [email protected] to clients
[email protected] but, handing out the email [email protected] to clients
[email protected]
[email protected]
[email protected]
[email protected]
[email protected]
[email protected]
[email protected]
etc…
Thanks
Mark
My domain email is not working.
I mite sound sort of stupid to be askin this, but cant help it :D I wanna use just the google apps for email n I dnt want a hosting or anythin for my domain. so if I register just a domain without a hosting plan, can I use google apps n how ?
I haven’t done it myself, but I believe you can. When you start to register for Google Hosted Apps, you have the option to register a domain name (through GoDaddy) right from the registration form.
Thank you for the extensive help. I was unable to find enough information elsewhere and this post helped set up my business domain. Im greatfull. Thank you.
I have a Google Apps email account set up but cannot find any way to get back into it to make changes. All I can find is the setup link. Of course it says the domain is already set up.
[…] up your email using Google Apps for Domains, which enables you to use Gmail with @yourdomain.com. Here are detailed instructions on how to do […]
Great article. We’ve just moved all our clients off Smartermail and onto Google Apps. No more blacklisting or bounced mail. Only wished we’d made the move years earlier.
Moving to Google apps is so easy I could do it drunk.
By the way, your website address is showing (grymala.com).
I’ve been set up with my mail.[mydomain] hosted by Google for several years, with incoming messages being deleted as they are downloaded by my client (Outlook 2000). What I didn’t realize until I had occasion to use Web access while traveling — and not having my own computer available — was that Google is automatically retaining copies of my Outlook-generated outbound messages.
I do not want that. I keep what I want here, on my machine, and want only messages I actually compose during Web access to my domain to be retained there — or, if it cannot be made selective, none retained at all. Right now, Google is storing almost 3,000 outbound messages which, it seems, I can delete only 50 at a time.
How do I turn off Google retaining those copies? Their mail hosting facility does not appear to offer that option.
i have webserver home with webstore , i dont have static ip from my internet provider
can i get domain name and ip updater from google apps like dyndns.org??
Great read!
Thanks!